Introduction
In order to make a connection to a database you just have to copy the jar file to the domain lib folder and make the configuration, through the web console or the command line.
In this tutorial, the MySQL driver will be used, but any other is very similar.
The directory where you installed WildFly will be referred to as %GLASSFISH%.
Copy driver jar file
The driver and datasource class is located in de Connector/J download. Copy the jar file (like mysql-connector-java-5.1.33.jar) to the %GLASSFISH%/glassfish/lib directory.
Configure server
The configuration of the server can be done in two ways. The web console or the command line.
There are 2 parts in making a connection to the database, the connection pool with the info of the database, and the JNDI name it will be bound in the server.
JDBC Connection Pool
For the connection pool, we need to specify database connection parameters like location of the database and credentials. You can follow these steps to perform it through the web console.
-
Open the administration console in your browser by going to the url http://localhost:4848
-
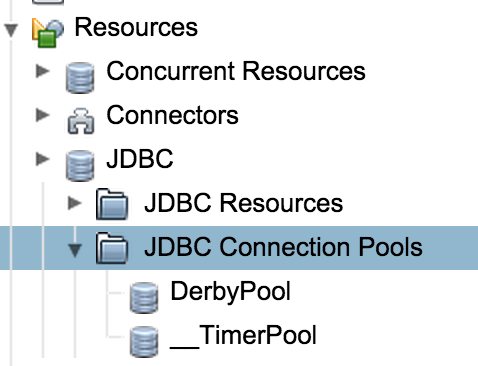
Find the JDBC Connection pool menu on the right side (see also figure 3.1), and click on it.
-
Make a new pool, by clicking on the
New…button. -
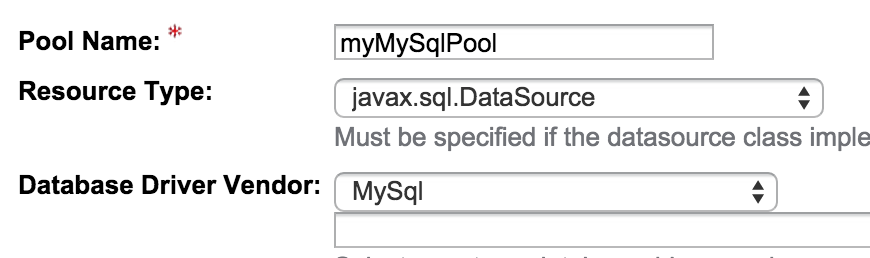
Specify a pool name (can be anything, no requirements), select
javax.sql.DataSourceas Resource type andMySqlas Database vendor. See also figure 3.2. -
Click on the
Next…button. -
In the section Pool settings, you can change connection number and other parameters. The default initial/minimum count of 8 can probably reduced.
-
There are a lot of additional parameters by default. They can be removed or kept. The important thing is the url, user and password parameters. (watch out for the case)
-
url → jdbc:mysql://localhost:3306/<<your-database>>
-
user → the_user
-
password → secret
-
-
Click on the
Finishbutton.
There is an important remark about an empty password further on.
From the command line
Start the asadmin command line tool, you can find it in the directory %GLASSFISH%/bin
-
Make sure the server (or correct term, a domain) is running. If not, you can start one with the command start-domain
-
Execute the following command (multi line for easier reading)
create-jdbc-connection-pool
   --restype javax.sql.DataSource
   --datasourceclassname com.mysql.jdbc.jdbc2.optional.MysqlDataSource
   --property "user=the_user:password=secret:url=jdbc\\:mysql\\://localhost\\:3306/rubus" mySqlPool
The : must be escaped since it is the delimiter for the different properties. Therefore, it need to be noted as \\:.
JNDI Name
The last, simple, step we need to do, is to assign a JNDI name to this datasource, so that we can reference it from within a persistence.xml file or other ways.
From within the web console, follow these steps.
-
Select the JDBC Resource menu on the left (just above the JDBC Connection pool menu)
-
Click on the
New…button. -
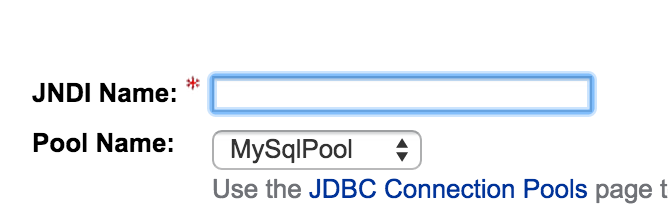
Specify the name, must be in the format
jdbc/<<name>>, where you can choose the name of course. -
Select the pool, we created in a previous step, see above. (see figure 3.3)
No other input is needed.
From the command line
With the asadmin tool, you can create also a jdbc resource. I assume you are still in the tool, with a domain running (see above).
You can execute then the following command.
create-jdbc-resource --connectionpoolid mySqlPool jdbc/mysql
Varia
Empty password
An empty password can’t be specified, not with the web console, not with the command line tool.
Of course, an empty password isn’t a best practice. For a local development environment, it can be considered and you can follow the following procedure:
-
Follow the above procedure and put in a wrong value for the password.
-
Open the
%GLASSFISH/glassfish/domains/domain1/domain.xmlfile and look for the wrong password you have specified. Make the value empty.
The password value should look like this.
----
<property name="password" value=""></property>
----
Of course, if your resource isn’t defined in domain1, look in the corresponding directory.